A DIY Weight Tree for bumper plate storage and fixing your mess.
I know I had a problem!
I have to admit…I had a serious weight problem.
Doesn’t matter what I did, I just couldn’t manage my weight.
Yea, it’s true…I had a weight PLATE problem.
Iron plates or bumper plates, it doesn’t matter. I’ve tired laying them up against the wall, stacking them, putting them inside pallets, and many other options, but I never tried a DIY Weight Tree
Nothing has worked.
Sure, I could go buy a fancy Weight Tree from Rogue Fitness…And they are rather cheap, until you calculate shipping…
BUT, I find it really hard to spend money on equipment that will in no way, shape or form make me stronger, faster or fitter.
Think about it…
Barbell holders, weight trees, dumbbell racks…They make your equipment look nice. They help you stay organized and perhaps just a little bit safer.
But not fitter…
However, when you gather nearly 1,000 lb of plates they will become a nuisance. In fact, they will end up all over the place. So while this project won’t add to my fitness, it will add to the cleanliness of my garage and give me more space to train. That’s a win!
Sooooo…
Ladies and gentlemen it is time for another Garage Gym DIY project!!
In recent months we have done a DIY Whiteboard and covered a semi-DIY with using PVC and chains in the garage gym, but those were too easy
The last INTENSIVE DIY project we did with cutting, measuring, and screwing was the DIY Jerk Boxes.
And that was perhaps the most involved project I’ve ever done.
But now we have a not-so-hard, yet, super helpful DIY project:
DIY Bumper Plate Storage: Weight Tree
What You Need to Know
Cost:
- With Wheels ~$130
- Without Wheels ~$Just under $100
Time: 1-2 Hours
Difficulty: Easy-Medium (depends if you have ever drilled holes in a 2×4 before)
DIY Weight Tree Shopping List

Go buy the following items:
**Refer to the list below** – Some items pictured are not needed, like glue…I didn’t use any glue.
- (3) 3/4″ x 30″ Black Iron Pipe(s)
- (1) 2″ x 4″ x 12′ Board
- (1) Box Wood Screws, 2″
- (2) Flat Plate Brackets 5″ x 3 1/8″
- (1) 4″ x 4″ x 8′ Board
- (1) 1″ x 6″ Speedbore Drill Bit (for drilling holes in 2 x 4)
- (4) 4″ x 4″ Steel Post Base(s)
- (4) 90 Degree Brace (Lowes Store Code: USP 4-13/16-in G90 Galvanized Finish Corner Brace)
- *OPTIONAL* (4) 3″ Swivel Cast Wheels 250 LB Capacity
Tools Needed (at a minimum)
- Circular saw capable of cutting 4″ x 4″ board
- Corded or Powerful Cordless Drill
The items in this project add up fast because we will be using a lot of metal; i.e. metal brackets, braces, and the black iron pipe itself. In the planning phases of this project I considered using wooden dowels instead of metal pipe and using 2″ x 4″ to cut my own braces and brackets…
It would have saved a lot of money, and would have brought the entire project closer to $50. However, you don’t want this thing breaking on you, so if you make any modifications, do so at your own risk.
In fact, be sure to read our DIY disclaimer before tackling any project by yourself.
DIY Weight Tree Part 1: Build the Upright

The upright is where the weight will actually be held. The upright is made of 2×4’s and three 30†x 3/4†pipe.
Step 1: 2×4 Cuts


- Make the Following 2×4 Cuts:
- (2) 50†boards
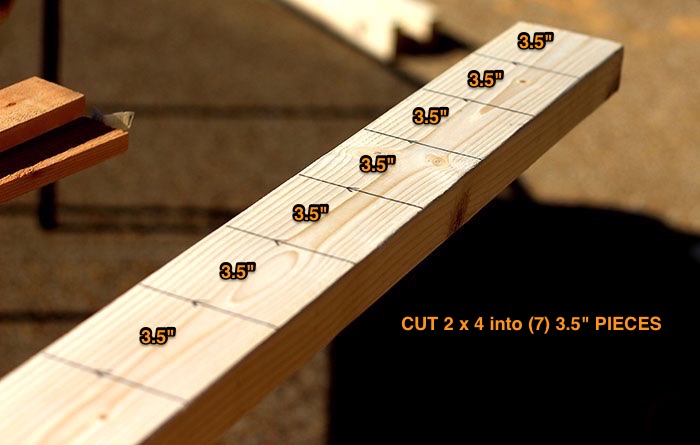
- (7) 3.5†pieces
Step 2: Drill Holes

- Drill 3 holes in each 50†Board
- Measuring from bottom to top the holes will be ON CENTER* at:
- 13.5â€
- 32.5â€
- 45.75â€
Simply drape your tape measure across the full 50†board and draw lines at each of the above lengths.
*Note “On Centerâ€: On Center means that you need to find the center on the lines you have drawn. A 2×4 is actually 3.5†in width; so the center (where you draw your circle) is measured at 1.75â€. *
Now, that you have two 50†boards with lines ON CENTER at the appropriate lengths, you will drill 3 holes on those centered spots.
Use a Speed Bore drill bit at 1†in diameter to drill the 6 total holes.
Step 3: Place Pipe and Pieces

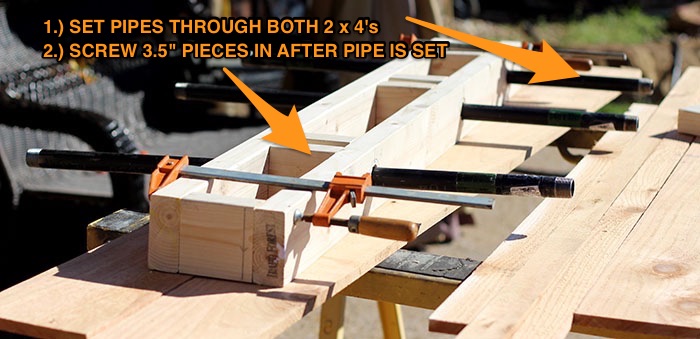
Next, you will line up your two 50†boards and place your pipes through the holes on both boards.
AFTER, I SAID AFTER Your pipes are set you can drill in your 3.5†pieces connecting the 50†boards together. You want to make sure your pipes are through both boards before you drill in your 3.5†pieces to make sure you haven’t made any huge mistakes.
Pipes should also be centered:
- There should be 11.75†of pipe on each side of your board. And 6.5†of your pipe will be running through the center of your 2×4’s.
- Secure each 3.5†piece with 2 screws on each side of a 50†board. So, 4 total screws should go into each 3.5†piece (two each side).
You now have a completed upright.
PAY ATTENTION TO THIS NOTE:
*Note: Metal pipe does not measure the same as wood. Our metal pipe is 3/4†in diameter but we will use a 1†in diameter speedbore bit. **This WILL NOT give you a perfect fit**. You will need to use the 1†bit and move it around the hole making it slightly wider by angling the bit slightly back and forth.
Why do it that way?
- You want your pipes to fit EXTREMELY snug. If you get a bit that is too big they will simply slide right through the holes and it won’t be very secure. I made the holes just big enough and used a rubber mallet to gently push them through the holes.
Moving on!
DIY Weight Tree Part 2: Build the Base

The base is what will give stability to the upright, and thus, is made with some of the strongest (thickest) wood we could use.
Step 4: 4×4 Cuts

- Make the Following 4×4 Cuts:
- (2) 26†pieces
- (2) 22†pieces
Step 5: Put Base Together


Once you have made your cuts, take your (4) 4×4 brackets and screw them ON CENTER of the (2) 26†4×4 boards.
Screw the (2) 22†4×4 boards into the brackets leaving the insides of the brackets with no screws.
Lastly, secure the 22†4×4’s together with flat brackets on top.
(Optional) Step 6: Add wheels

This step is optional because the DIY Weight Tree will work perfectly fine without wheels. Also, not getting wheels will save you a lot of money.
Flip your base over and secure the wheels. Make sure you have enough screws with a flat top to fit the holes of the wheels.
Your base in now complete.
DIY Weight Tree Part 3: Connect the Upright to the Base

This part is pretty easy
BUT DON’T MISS THIS: Make sure the metal pipes are PARALLEL with the 26†4×4 boards. This will make the structure more stable.
IF YOU DO THAT incorrectly, your DIY Weight Tree could very well fall right over once you load it with weight.
You will secure your upright to the base ON CENTER using (4) 90 degree brackets connecting each leg of the 2×4’s with the 4×4 base.
And that’s it!
You now have a DIY Bumper Plate Weight Tree capable of holding A LOT of weight, and moving it around (if you add the wheels).
This project was a longtime coming for me!
If you have any comments or questions be sure to add them below and I can help you out!
Thanks!
Jerred


