

The Reverse Hyper.
It’s almost a mythical creature.
Maybe you’ve heard of a Reverse Hyper. Maybe you’ve been lucky enough to see one.
We know a lot of Garage Gym Athletes would love a Reverse Hype but can’t justify purchasing one.
Well, here you go! Here are in-depth instructions on how to build one that is affordable and good quality.
Notes & Benefits to using a reverse hyper
- Invented by Louie Simmons (this is debated, but we like Louie), for increased strength, speed, power and muscle mass
- Achieve greater hip extension than Romanian Deadlift
- Good to rehab your back (decompresses spine), run faster or just have a nice backside
- Can be done heavy or just bodyweight
Watch this video from Louie Simmons about the Reverse Hyper:
(From the builder/contributing author)
I used the Trap City Fitness reverse hyper design to build my own reverse hyper for my garage gym.
I’m a novice at best when it comes to home improvement and carpentry, so I was a little intimidated at first.
However, I found the plans simple & easy to use and found it easy to reach a few stopping points along the way if your time to work on projects like this is as limited as mine.
While the measurements were all clear and accurate, my only word of advice would be to measure and line up all of your pieces before cutting.
It helps to visualize what your finished product will be (all the available pictures were very useful for this) to give yourself a better sense of the direction you’re going as small adjustments may be needed based on the accuracy of your cuts, available tools, etc.
Once constructed, I have been blown away by the stability and functionality of my reverse hyper.
I have allowed training partners and family to test it out as well with people ranging from 100 lbs to 275 lbs and various heights all finding it comfortable and easy to use.
The swing arm surprisingly creates very little noise and provides the full range of motion seen with more expensive models.
My frame has no fore/aft or side-to-side movement and the 3-inch pad and automotive grade vinyl I used feel identical to other high-end pieces of fitness equipment in my gym. I have used both iron & Bumper plates and both are secure and quiet when used with the recommended clamps.
I have compared my hyper to a Rogue RH-2 and I can tell little to no difference in terms of functionality. As a final note, when painted to the colors of my gym, the custom look of my hyper blows the standard manufactured models out of the water.
Tools
- Miter Saw
- Skill/Reciprocating Saw
- Circular Hand Saw
- Power Drill/Screwdriver
- Clamps
- Pipe Wrench
- Assorted Wrenches/Socket Wrenches Staple Gun
- Speed Square
Materials
LUMBER
- 12 Pieces 2x4x96 Pine
- 1 Piece 1/2†4×8 Plywood 2′ 1.5†Dowels
- PIPING
- 38†1/2†galvanized pipe 2 Pieces 12†1†pipe
- 1 1†T Junction
- 23†1†pipe
- 1†nipple
- 1-1.25†increaser
- 1.25†nipple
- 1 1.25†T Junction
- 2 6†1.25†galvanized pipe 2 EMT couplings
- 2 1/2 caps
HARDWARE
- 22 4.5†Carriage Bolts with matching washers, nuts and snap washers 2 small boxes 3†framing screws
- Wood Glue
UPHOLSTERY
- 27â€x36†3†High-Density Foam 4’x4′ Vinyl
MISC
- 1.5†Carabiner
- 2 1†Utility Rings 3′ 2†Webbing
- 2 1.5†Utility Rings
STEP 1. STRUCTURAL MEMBERS
Cut all 2×4†pieces of the frame using a miter saw.
Many of the pieces will require either a single or dual 22.5-degree cuts. For the sake of simplicity, all prescribed lengths are in reference to the longest section of that piece.
Tutorial Notes:
- Where a single 22.5-degree cut is required the / icon will be used.
- On pieces where there are multiple 22.5-degree cuts either the / / icon will be used to indicate that the cuts are parallel to each other or, the / \ icon will be used to indicate that the cuts are to be in opposing directions.
The 2x4s will be cut into sections of the following length;
BASE PIECES
- 2 Pieces cut to 57.5†with a single / degree cut 2 Pieces cut to 50†with / \ degree cuts
UPRIGHTS
- 4 Pieces cut to 38†with / / degree cuts
- 4 Pieces cut to 41.5†with / / degree cuts
TOP PIECES
- 2 Pieces cut to 29.5†with a single / degree cut
- 2 Pieces cut to 14.25†with a dual / \ degree cuts
CROSS BEAM
- 1 Piece cut to 30.5â€
HANDLES
- 2 Pieces cut to 18.5†with single/degree FLAT cut
- 2 Pieces cut to 10.5â€
PLATFORM
- 8 Pieces cut to 36â€
BASE CROSS BEAMS
- 3 Pieces cut to 36â€
STEP 2. LAYOUT STRUCTURAL MEMBERS
Once all sections of 2×4 have been cut then it is time to assemble the frame.
For this step, the power drill/ screwdriver, wood glue, clamps and framing screws will be required.
Remember that long-term, it is the wood glue which will hold the pieces together. The framing screws only ensure the wood glue has the chance to bind effectively.
First, lay all the pieces out is in the picture above to ensure the edges line up flush with one another.

After the pieces have been aligned begin securing the following pieces to each other;
BASE x 2
- Secure a 50†section of the base to a 57.5†section of the base using 3 screws, wood glue and clamps.
- The 50†section will be secured 3.5†back from the edge of the 57.5†sections.
- Make sure that when securing 2×4 sections to each other that as 22.5 degree cuts are parallel to each other.
- To ensure the piece is aligned properly a 41.5†section of upright should fit flush and perpendicular in the space left (later this will be where the upright is secured to the base).
- Repeat this step once more to construct to other pieces of the base.
*THE SECOND PIECE OF THE BASE SHOULD MIRROR THE FIRST PIECE.*

UPRIGHTS x 4
- Secure a 38†section of upright to a 45†section of upright using 3 screws, wood glue and clamps.
- The 38†section will be centered on the 45†section.
- Make sure that when securing 2×4 sections to each other that all 22.5 degree cuts are parallel to each other.
- To ensure the piece is aligned properly the assembled upright should fit flush and perpendicular in the space remaining from the base section.
- Repeat this step three more times to construct the other uprights.
*REMEMBER, THE FOUR UPRIGHTS WILL FACE EACH OTHER AND MUST MIRROR EACH OTHER.*

TOP x 2
- Secure a 14.5†section of the top to a 29.5†section of the top using 3 screws, wood glue, and clamps.
- The 14.5†section will be secured 3.5†back from the edge of the 29.5†sections.
- Make sure that when securing 2×4 sections to each other that as 22.5 degree cuts are parallel to each other.
- To ensure the piece is aligned properly a 41.5†section of upright should fit flush and perpendicular in the space left (later this will be where the upright is secured to the top).
- Repeat this step once more to construct to other pieces of the top.
*THE SECOND PIECE OF THE TOP SHOULD MIRROR THE FIRST PIECE.*

STEP 3. FRAME ASSEMBLY
Now that the Base, Uprights, and Tops to each side of the frame have been assembled, the various pieces of the frame can now be secured to each other.
At Each point where the pieces fit flush with each other, secure the pieces with 4 screws in a diamond pattern.
Ensure that there is enough space between the screws to run a carriage bolt through.

At this point, you should have to frames that mirror each other. If they are put together properly and if you are on the level ground they should stand independently.


STEP 4. CONNECT THE FRAMES BY CONSTRUCTING THE PLATFORM
The next step is to connect the frames to each other across the top, forming the platform.
Begin at the top/front section of each frame.
- Secure the 36†2x4s across the top, making sure that at each connection a 90-degree angle is formed.
- Once all 8 pieces have been secured with framing screws, check each corner once again to confirm that a 90-degree angle is formed.
- Lastly, at the front of the platform perform a single 22.5 degree cut across the length of the piece using a circular hand saw. This cut should line up flush with the uprights. This cut ensures that the front brackets will sit flush between the uprights and the platform.
STEP 5. MARRY THE FRAMES AT THE BASE
Our next step is to connect the base cross beams to the base of the frame.
For this step simply secure a 36†2×4 at the front, middle, and back of the assembly using framing screws.
Ensure that each connection is a 90-degree angle

STEP 6. SECURE THE FRAME AT THE BACK OF THE STRUCTURE
After the platform has been secured to the frame secure the 30.5†piece between the two top pieces using framing screws.
When secure the back end of the assembly should appear closed off.
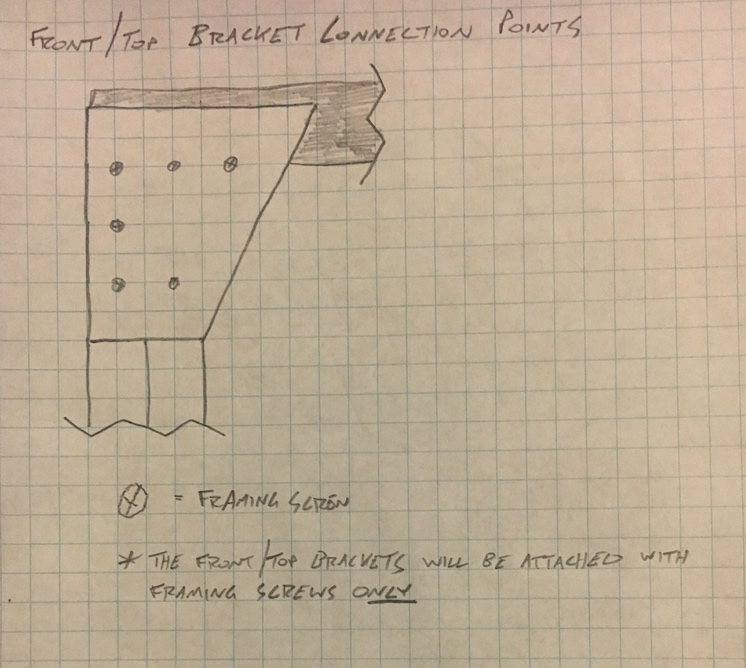
STEP 7. SECURE THE BRACKETS
Next, connect the brackets at the base of the assembly, the top, and the front.
Make sure the brackets line up flush with the uprights and platform, or uprights and base.
Secure first with wood screws and then with carriage bolts.


STEP 8. ASSEMBLE THE HANDLES
For the handles first, screw the 18.5†piece underneath the section of the rear section of the platform.
The 22.5 degree flat cut that was made earlier should allow the 18.5†piece to fit flush in the corner of the rear upright and top piece.
Next, secure the 10.5†piece to the top of the 18.5†piece using wood glue and screws.
For the handle, you may use a piece of piping secured to a flange, or drill holes into the wood and use wooden dowels as adjustable handles.

STEP 9. BUILD AND PLACE THE PENDULUM
Precisely 5.5†in from the front and 1.75†down from the top drill a 1/2†hole on each side of the top of the frame.
This hole will be for the 1/2†galvanized pipe to pass through.
- Secure each piece of 12†1†pipe to the 1†T Junction.
- Feed the 1/2†pipe through the opening.
- The hole will be snug and a pipe wrench will be necessary in order to Feed the pipe through.
- Feed through the pipe through far enough to allow for 1†assembly to slide over the pipe.
- Feed an EMT coupling over the 1/2†pipe followed by the 1†assembly.
- Continue feeding the 1/2†pipe through the 1†pipe until the second EMT coupling can be placed over the 1/2†piping.
- Once the 1/2†piping has been secured completely through the top sections of the hyper, secure the caps to the exposed threads on each side.


Assemble the remaining sections of 1†and 1.25†galvanized pipe to create the “pendulum arm
The order will be:
- 23†section of 1†pipe to
- 1†nipple
- 1-1.25†increaser
- 1.25†nipple
- 1.5†carabiner
- 1.25†T junction
- 6†1.25†x 2
Once the pendulum arm has been assembled, secure the arm to the 1†T junction.


STEP 10. ADD PADDING AND VINYL
Place 3â€high-density foam over the platform and wrap it in place with the vinyl.
Fold vinyl over the padding similarly to wrapping a Christmas present and secure using a staple gun.
While securing the vinyl loosen the top and front brackets to allow for the vinyl to cover all sections of the platform.
Resecure the brackets back in place once the vinyl has been wrapped around/over the platform.
STEP 11. ATTACH STRAP
Using the webbing make a water knot on each side.
Loop the excess webbing around a utility ring on each side.
Feed the excess webbing back through the water knot to secure the rings in place.
Clip the rings to the carabiner.


