Build Your Own Power Rack
What You Need to Know
Cost: Less Than $100 Time: 2-3 Hours Difficulty: Medium**
Your equipment arsenal is not complete without a power rack.
Actually, there are a few other options out there in the crossfit equipment world…but this one is so cheap, so simple and so awesome.
I did a lot of research in buying/making a power rack. I found a lot of good designs for homemade, but I found a lot of them were overdone and too expensive. Same with buying a power rack…way overpriced. So I built my own.

STEP 1: Buy the following list

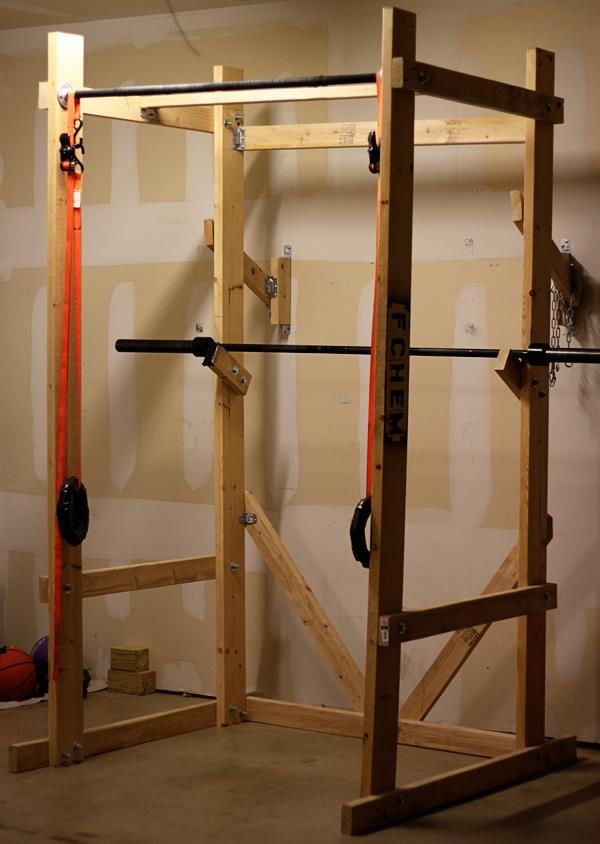
Here is a list of everything you will need to buy if you are starting from scratch. Chances are you may have some of this stuff lying around already. As you can see from the first picture the design is very simple.
-SUBTRACT the gorilla glue. I didn’t use a drop of glue on this project.
STEP 2: Make sure you bought all DIY Power Rack Materials
This option is still WAYYYYY cheaper than commercial alternatives.


STEP 3: Get to work (Build your frames)

The rack can be scaled to the space you have available since the design is so simple. Just keep that in mind if you build one. I kept mine simple with minimal cutting so it was a little bit bigger than it had to be. I did not want to mess with cutting pipe and having to rethread it so my frames were built around the pipe. And of course like a majority of my crossfit equipment, it is rather study.
1st- Lay out your two 2x6’s then cut your two 2x4’s. What you are cutting is the upper support beam and the squat safety bar. Keep in mind your if you have a low ceiling you want to make sure your face won’t slam into it when doing pull-ups so keeping your 2x6’s at 8 ft. is up to you. Also, since I made my squat safety bar permanent, you want to make sure that it is low enough for you to go all the way down on your squat without any problems.
-I cut my top support beam and squat safety bar at 43”. -My top support beam is secured by two bolts drilled through on each end at 45 degree angels. -My squat beam is only secured by one bolt at each end.
2nd- Cut your bottom support beam. Mine extends well beyond each side of the rack. They were cut at 56”. The extra length adds support during normal and kipping pull-ups
-These too are secured by two bolts on each ends at 45 degree angles from one another.
At this point your frames should be built…and you’re almost done.
3rd Your basic frame should be built. You may want to stand them up and see EXACTLY where you want to place your flanges for the pull up bar. I determined I wanted them pretty close to the top with just enough space for my chest to be above the bar and still have about 5 inches before my head would hit the ceiling.
-After you determine this you can add your flanges. My suggestion is secure a flange to one side then screw in the pipe. Then screw the flange on the other side of the pipe THEN secure it to your second frame. If you do it in any other order you are adding unnecessary work.
So your frames are built…


STEP 4: Put the frames together
-Put the structure together on the ground starting with the pipe as stated above. After you have done this you can add the back support beam as seen in the picture. It should be cut to whatever length measures between the two 56” bottom support beams. Has your spectacular piece of crossfit equipment come to life!?!?! I know what you want to do…


DO NOT do pull-ups on this structure yet. She’s not ready.
So at this point you should have your basic structure erected and all the basic framing done. All that is done from here is a few extra support and brace beams for added structure support.
STEP 5: Add Support
All the cutting from here on is at your discretion. Here is what I added for more support.
-Two 45ish degree braces running from the back support beam to the main vertical structure. -Two top support beams. 1 mimics the bottom back support beam just at the top. The other was put in to connect the top of the structure from inside to inside.
-The next thing I did all depends on if you want to KIP in your pull-ups or not. Being a crossfitter, I do. So I secured my structure to my wall studs. This means I can kip, swing, and go crazy with out the structure moving. Some guys put weight on the structure to keep it from moving, but that gets annoying. Secure it to the wall and you’re done.
-Last thing is add your bar holders for squats. I cut mine about 10” and secured them with 2 bolts at 45 degree angles. Make sure they are tightened down really well.


This was certainly an easy project. If you want any specific directions or if I missed a step just let me know in comments. I can give you any measurements and directions you need. I just wanted to give the pictures and the basic layout.
DOES IT WORK????
Been using it for months now
-400 lbs on the squat rack…no problem -100’s if not 1000’s of pull-ups…no problem -ring dips and muscle-ups…no problem
If you build this design with no glue, like me, just secure your bolts once a month and make sure they are tight. It should be good. This thing should last a good while and be the center piece of all your crossfit equipment…and if something fails on it I would certainly take the Saturday to build a new one. Speaking of if you are not mechanically inclined to build your own CrossFit Equipment I highly discourage it. I have picked up a few skills in my day and I trust my crossfit equipment. If you would not trust yours…don’t bother